
I hope my voice isn't too annoying. :-/
Wednesday, May 12, 2010
Saturday, May 8, 2010

Remaining Goals
Before the final submission on the 11th, here is what I hope to achieve:

- Texture support for the loaded head OBJs.
- Shader for hair strips based on the lookup textures that I made for 660. Take a gander! Yes, I'm thinking about scrapping the LODs (I can leave support for them in the code base, but they look quite ugly and don't improve the program running time as much as I thought they would; since the 660 results look okay, I can try to use them for shading thick GL_LINES and see how those results compare to the LOD clusters).

- Additional Bullet soft body constraints to prevent the hairs from swiveling at their roots. I'm going to try appending an additional link that connects the second node of each strand back to the head (i.e. this isn't as simple as calling a "SetConstraint()" method; I'll have to get a little creative to pull off the effect).
- Faster simulation times. I'm not sure how to do this at the moment; since the current Bullet library doesn't have CUDA support, I'll have to think of some other way to speed things up. Maybe by fixing memory leaks? Maybe by using multithreading (I don't even really know if that's applicable in this case, but it sure made Kaikai's ray tracer into a speeding bullet).
Monday, May 3, 2010
Still Posting!
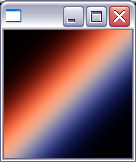 Oh look, it's a lookup table for the longitudinal component of Marschner's scattering model. Isn't that the cutest thing you've ever seen? It's not too far off from the one used by NVIDIA in their Nalu demo. Maybe there is hope for writing a hair shader after all (instead of cheating with LODs).
Saturday, May 1, 2010
System Overview
 Forgot to post this; it's the spiffy (simplified) system overview that I showed in my presentation!
Friday, April 30, 2010
Final Presentation Videos
Here are the results that I showed at the presentation today. I really, really want to keep refining the project to get higher quality results by the time the final write-up is due. But, I'm going to have to switch gears over to finishing the 660 shader first. As you can see, I wasn't able to get the 660 shader working in time to color the hair strands, so I made a hasty decision to get LOD clusters working. They look kind of silly (perhaps if they were textured, they would look better). Another sore spot is the unconstrained hair movement at the point where each Bullet rope is anchored to the collider. I've searched through the Bullet API for a way to constrain the anchor "swing", but after hours of trying different parameters, this is what I ended up getting. Also, note that these videos were not recorded in real time (~3x the original speed). Terrible, I know.
I've learned a lot from this project, even if the results don't match up to what I set out to do. (Especially with regard to stitching together a lot of different APIs, in this case OpenGL, FLTK, OpenMesh, Bullet, (a Timer class), and the ConvexHullDecomposition library). There was a lot that I didn't put into my presentation...I didn't leave myself enough time to make it. But, I suppose since our presentations were supposed to only be 10 minutes, this was a "blessing" in disguise.
Wednesday, April 28, 2010
That Blasted 660 Shader!
Blast! This does not look like hair! What is that crazy random highlight on the side? I wanted to show what I've been working on, though.

Tuesday, April 27, 2010
Improved KF data
Goal: Get better test data (including a deforming head mesh as well as corresponding KF data)
I've written a Maya plugin that generates a KF file based on the keyed position and orientation of a selected object in the Maya scene. Now I have the ability to create all kinds of "low dynamic movements", such as this head shake. [Note that the key hair properties still need adjusting; I should definitely pump up their mass]
Alas, figuring out how to deform the mesh is probably going to remain unresolved. This was supposed to be where Cat's pipeline merged with mine (i.e., she would give me an OpenMesh data structure with deforming vertices). Creating a deforming mesh on my own would require a good chunk of work...or would it? I could fake a deformed mesh, I suppose. Since the control node stores position and orientation data for the rigid collider, I could steal that data, make some transformation matrices and iteratively transform all the vertices in the loaded head accordingly. Obviously, this isn't the same as creating some kind of DeformedMesh class structure, but it would definitely help illustrate the functionality of my project. I'll try this out and see how it goes.
Our presentations are on Friday. Here's what I'm going to try to accomplish by then:
I've written a Maya plugin that generates a KF file based on the keyed position and orientation of a selected object in the Maya scene. Now I have the ability to create all kinds of "low dynamic movements", such as this head shake. [Note that the key hair properties still need adjusting; I should definitely pump up their mass]
Our presentations are on Friday. Here's what I'm going to try to accomplish by then:
- predecimation/prescaling of the original input head OBJ
- implement a threshold to prevent interpolation between key hairs that are too far away from each other (like the ones on either side of the nose)
- fix memory leaks
- a basic hair shader (depending on whether or not I can pull through with CIS660...)
- animated original head ("pseudo deformed" by the method described above)
- enable CUDA
Friday, April 23, 2010
Improved Collider Tracking
Goal: Make the head collider oblivious to the forces introduced by the key hairs
I'm getting there! Unfortunately, since the CPU calculations are slow, it's difficult to see what the true weight/speed of the movement is. So, I've captured a simulation with only 20 key hairs. Things are still a bit slow, but more coherent than the full head of hair result. Behold!
The rest of today will be dedicated to working on the Marschner shader. Methinks making a look-up table for different directions to the light source is ideal. This is pretty straight forward for the Gaussian lobe calculations; the M_R, M_TT, and M_TRT functions all take 2 arguments (the azimuth and inclination angle of the light source) and output only one value; meaning they can be combined into a single colored texture with 3 channels. There are 2 advantages to trying this texture storage technique: (1) I can visualize the flattened lobe/coloring distribution for debugging purposes, and (2) I found a tutorial on how to make a GLSL shader that assigns textures. Everybody wins! (maybe)
Beta Pipeline
 This is the pipeline I showed at my Alpha Review (more like Beta, since I've been beating this project with a stick for 2 semesters). It's going to get a make-over for my final presentation, but the modules are going to stay pretty much the same.
Sunday, April 18, 2010
"Hacky" Collider Tracking
Goal: Use control laws to extrapolate the linear and angular velocity (or force) necessary to move the head rigid body so that its position/orientation matches that of the control node
The (hairless) head collider can now move and twist to match the control node! Unfortunately, my means of accomplishing this are a bit "hacky": at each frame of the simulation, I set the collider's position/orientation equal to that of the control node. The "proper" method sets linear/angular velocities or forces, but I'm running low on time, so I'll use the "hacky" approach for now.
We're in the home stretch now! Final demos are in 2 weeks. In the remaining time, I hope to accomplish the following:
- A memory management overhaul (ironically, in an attempt to make my code more compact and legible, I somehow introduced even more deallocation problems than before)
- [CIS660] Finish the hair shader (using the work of Zinke and Marschner as a guide)
- Translate the hair shader code into a GPU vertex shader language (GLSL most likely)
- Make the head collider oblivious to the forces introduced by the key hairs (alas, I cannot simply set the position/orientation of the hairy head collider; it wiggles around and drifts due to the extra inertia/weight produced by the attached hairs - I'm waiting to see what the Bullet forums has to say about this one)
- UI cleanup (plug in UI features that haven't been implemented yet, such as automatic scene rescaling and a means for specifying simulation/rendering parameters)
- Get better test data (including a deforming head mesh as well as corresponding KF data)
Wednesday, April 14, 2010
Projected Key Hairs
Goal: Fix Bullet hair oscillations by projecting hair roots onto the head collider.
Projection onto the collider seems to be working now. I ran into some usage issues with the convex hull decomposition library (but an e-mail to its developer cleared things up). Since my collider is composed of multiple hulls, I have to iterate through all of them, checking to see if a scalp vertex projection onto the current hull yields a better result than for the previous hull. My "best choice" heuristic for this decision is based on distance (i.e. the intersection point farthest along the ray that points from the collider's center --> the scalp vertex). The results look good, meaning that the key hairs are now growing out from the collider instead of from the scalp mesh. As I predicted, Bullet is much happier with this hair anchor position, and only a few of the key hairs oscillate slightly. How to resolve the remaining oscillations is going to be tough. I could turn to the forums, but I fear this is an issue with the robustness of the engine (since I've already tried maxing/zeroing out all the parameters associated with a Bullet soft body). Oh well, can't hurt to try again.
 Each convex hull in the collider has its own pastel-y color now! As you can see, there's still a need for a pass in the pipeline that takes the original (very dense) input mesh, decimates it, scales it up slightly, and then sends the result to the convex hull decomposer. One issue that crops up now that the key hairs are grown from the collider and not from the scalp is floating key hairs. Since the collider and the original head mesh have slightly different boundaries, some of the key hairs will not be connected to the original head. To fix this (for now), I drew in an extra segment connecting the key hair roots to the center of the scalp, like so:
Wednesday, April 7, 2010
Marschner Progress (III)
 This sucker displays the following components of the Marschner scattering model:
- Ambient
- Diffuse
- R lobe (color and distribution), although more parameter tweaking is required
- TT lobe (distribution only)
- TRT lobe (distribution only)

Monday, April 5, 2010

Friday, April 2, 2010

Saturday, March 27, 2010
Marschner Scheme
 My attempt to sort out what the heck is going on in this paper. Click to enlarge.
I tried to write it all up in C++ first, but I got so mixed up and didn't know where the variables for each section were coming from. Maybe this will help me. Or...maybe someone who's really good at decoding math lingo can help me...? I'd much rather be working with more Bullet instead of this. You may be wondering, "what's this paper...what happened to Zinke?" Zinke's local component of the dual scattering calculation uses Marschner's BRDF, which is "explained" in this paper.
Goals Running in the Background:
Goals Running in the Background:
- Fix Bullet hair oscillations by projecting hair roots onto the head collider
- Try OpenMesh decimation (and scaling?) as a pre-step to convex hull decomposition
- Global multiple scattering (even though my love for opacity shadow maps has faded...)
Monday, March 22, 2010
Idea for Fixing Oscillations
After a good deal of playing around with parameters, I found that I was able to calm the oscillating hairs (mostly) whenever their anchors were above the surface of the collider.
 In this situation, the hairs are grown from inside the collider; Bullet gets mad and the hairs oscillate around wildly.
 But in this situation, the hairs are grown from outside the collider; aside from a few oscillations (unnoticeable from far away), Bullet is happy and the hairs stay still.
 In this situation, the hairs are grown from inside the collider; Bullet gets mad and the hairs oscillate around wildly.
 But in this situation, the hairs are grown from outside the collider; aside from a few oscillations (unnoticeable from far away), Bullet is happy and the hairs stay still.
So, growing the key hairs from the vertices of the original input scalp is a good starting point, but perhaps projecting each scalp vertex onto the collider and growing from these projected positions is a better idea. This would ensure that the key hairs are anchored to the surface of the collider and not somewhere above or below it.
Sunday, March 21, 2010
Interpolation (and memory leaks)
Am I graduating with a degree in computer science? Are you serious? Because...I just found out I could look at the Task Manager to check for memory leaks in my program. And you know what? It was leaky. And here I thought I was managing memory quite well all this time. I really don't know how I ever got by all those programming classes with good grades...(though being a temp grader has given me a hint). Well, anyway...the point is, this project has taught me a lot about programming practice in general, especially w.r.t. passing by reference, memory management, and getting different open source libraries to play nicely with each other.
Okay, so...interpolation. Progress so far is displayed below. Please note that HyperCam chews up some of my CPU power, so the program runs a bit faster than what is shown (yes, it's slow...but not that slow). The memory leaks aren't as bad as they were before I discovered the Task Manager trick, but there are still some there (I think). So, I still need to track down memory leaks and do more memory clean ups (std::vector's clear() function does not free memory automatically like I thought it did...). Other remaining issues (in addition to the ones mentioned in the previous post):
Okay, so...interpolation. Progress so far is displayed below. Please note that HyperCam chews up some of my CPU power, so the program runs a bit faster than what is shown (yes, it's slow...but not that slow). The memory leaks aren't as bad as they were before I discovered the Task Manager trick, but there are still some there (I think). So, I still need to track down memory leaks and do more memory clean ups (std::vector's clear() function does not free memory automatically like I thought it did...). Other remaining issues (in addition to the ones mentioned in the previous post):
- when two key hairs are very far apart (as is the case for the two on either side of the nose), interpolation between them causes blatant hair-head intersections, so I think I should implement a distance check before interpolating adjacent (in terms of growing from the same face) key hairs
- the convex hull decomposition step tends to yield hulls that lie just under the original head mesh surface; ideally, I would want the collider to completely encompass the original head mesh (i.e. have the red mesh completely surround the tan mesh); I think this would prevent the hair from falling below the scalp and causing bald patches; there are several ways I could go about doing this: (1) after reduction and before decomposition, scale the head mesh so that it is slightly larger than the original (I like this option), or (2) ask the user to provide a scalp that floats a little bit above the head
I should bring my focus back to the rendering side of the project, if I can. You know, those opacity shadow maps... x__x
Plugging in Bullet (Step 2)
Goal: Add the ability to render the Bullet soft body key hairs as lines
Check. Some issues that still need to be cleared up:
Check. Some issues that still need to be cleared up:
- For heavy hairs, the contact jittering gets really bad (you can see it when I zoom in). I've tried messing with all sorts of soft body parameters, but no dice. The only thing that guarantees less "wigging out" is a lighter mass. I'll poke around in the Bullet forums to see what the Bullet equivalent of "skin thickness" is. Unfortunately, light hairs don't have the kind of motion I'm looking for (they look like they're moving around in water). On the other hand, since this is all still on the CPU, the simulation is moving really slow to begin with...so I think I'll leave the parameter tuning for later on when I've (hopefully) found a way to bring the simulation rate up.
- When I rotate the collider to test the simulation, things get a little crazy. Heavy hairs pull on the collider more (i.e. influence its inertia), so unless the collider-to-hair mass ratio is very high, the collider will oscillate around wildly. I thought I had bumped this ratio up enough (see the videos of my Bullet tests) to get rid of oscillations, but perhaps I tweaking parameters messed things up. If I can somehow set the position/orientation of the collider at each frame without continuity issues, then maybe this issue would go away.
- an output line that gives the user feedback (error messages or status messages other than the ones associated with bad file parsing)
- memory freeing (I'm being sloppy with it at the moment)
- a loading bar for importing head meshes (because the convex hull decomposition step can take a while)
- automatic scaling to accommodate input meshes of different sizes (this would include grid size, camera movement increments, light position, control node size, and key hair parameters)
- interactive control over the control node (the ability to choose between playing KF data or entering an interactive mode that lets you move the control node with keyboard input)
Saturday, March 20, 2010
Plugging in Bullet
I am so random.
Goal: Plug Bullet into the GUI and draw the head collider
I have finally accomplished this goal! The following video demonstrates the ability to load an .obj file for the head, which is then used to generate a Bullet rigid body for hair-head collisions. For high-density meshes, the compound convex hull decomposition step (mentioned several entries back) takes a very long time. So, I would have to add an additional reduction step before the decomposition one. I think OpenMesh supports mesh reduction (or there must be some open source library out there that does). The collider is semi-transparent and spinning to demonstrate that I can control the Bullet physics. Alas, the physics are not yet linked to the control node's movements yet. Soon, though...
Friday, March 19, 2010
My very first LOD!
[Wipes away a tear]. Here is a video demonstrating my polygonal cylinder LOD that has dynamic parameters including: strand radius, strand stacks (smoothness), and strand slices (the number of divisions in each cylinder segment). From far away, a thick radius and low number of stacks/slices looks fine (ignore the odd shading). At the moment, the LOD uses quads instead of tris, but triangulation would be an easy addition.
Okay! Next step, opacity shadow maps for hair rendering. The Zinke paper uses deep opacity shadow mapping to approximate the global component of the dual scattering computation, but I'm going to start off with plain opacity shadow mapping to get my feet wet.
And yes, waiting (ominously) in the background of the current progress is Bullet integration and interpolation between key hairs. I'm skipping around a bit, I know...
Thursday, March 18, 2010
Smoothing Strands
Given a set of hair control points (like the ones outputted from Bullet's soft body ropes), I can now form a Bezier spline to make a "prettier" hair strand. Recomputing the Bezier function on every frame is very costly, though (part of that is because I'm just testing things out and not really being efficient with the number of loops I use). Anyway, after I get back from class later, I want to draw a triangle-mesh tube around the smoothed strand (my first LOD, I'm so proud...).
 (strand formed from the raw control points)
 (smoothed strand)
 (strand formed from the raw control points)
 (smoothed strand)
Friday, March 12, 2010
Zinke's Paper and Other Ramblings
As I've mentioned before, I'm implementing Zinke's dual scattering paper in CIS660 (which means I'll be able to kill two hair renderers with one stone, so to speak). That being said, the Zinke paper is a hefty one. Very dense. I've read through it several times and watched the presentation video twice...and even after all of that, I'm still trying to wrap my head around the math involved. I'm definitely getting the main points though. For example: depth map = way to cheat global multiple scattering = can get one from the GPU. So, my plan for approaching the rendering side of things is to see if I can grab a depth map from the CPU /GPU and use it to add shading to a solid color (the hair color). Hopefully this will give me an okay starting point (though not very shiny) for hair rendering. After that, it's a matter of implementing Marschner's single scattering model (to insert reflections). My goal is to have a couple renders to show in time for the Alpha Review (Mark II) on 3/19! Alas, my other goals are still up in the air at this point...other class projects are really cutting into my time. I'm going to try to get back up to speed before the 19th, though.
In the meantime, I figured it might be worthwhile to post my CIS660 overview presentation of Zinke's paper. Dual scattering is quite a clever concept, in my opinion...


In the meantime, I figured it might be worthwhile to post my CIS660 overview presentation of Zinke's paper. Dual scattering is quite a clever concept, in my opinion...


Sunday, February 21, 2010
I stepped in something GUI
 (Looks a little nicer. This version has scalp loading and visibility of objects working. Next step: plug in Bullet and draw the head collider.)
Tuesday, February 16, 2010
Extrapolating control node data from a point cloud
Here's an idea. If one can build skeletons for motion capture markers, then wouldn't it be possible to extrapolate master control node data during a head/face motion capture session? Say you have your actor with markers on their face (I need to find out the brand of reflective stickers used by Creaform's 3d scanners, because these would work very well on small surface areas such as faces and hands). You capture a snapshot of the actor's face. The captured markers become the "point cloud". Using either Vicon or some other program, you calculate the center of the captured markers/points. Then, you construct a "skeleton" for the cloud by parenting every marker back to a node at the calculated center (which acts like the skeleton root). And there you have it: a way of simultaneously obtaining detailed face deformations (which can be applied to a base template in the form of keyframed vertex movements - what Cat is working on) and master control node position/orientation data over time (which can be used in my proposed GUI setup). All in a single mocap session.
Taming of the OpenMesh
Goal: Add the ability to render/draw the original input head and scalp OBJs (perhaps store the geometry data in an OpenMesh data structure)
 (a decimated test .obj to represent the input head - no collider just yet)
 (the original .obj that Cat gave me...I would have to scale the program controls to accommodate its larger size...perhaps it would be a good idea to have this done automatically based on the mesh's bounding volume...)
Unfortunately, the other goals still need work...but I am proud that I figured out how to use the OpenMesh library (remember that pesky error from way, way back? I somehow managed to bypass it). Over the next several weeks, I am going to be presenting and implementing the Zinke paper ("Dual Scattering Approximation for Fast Multiple Scattering in Hair") for CIS660. The work from these assignments will feed right into the rendering portion of my hair simulator. It's going to be an offline process (slow approach) at first, but hopefully I can take the procedure used in my project code and give it the "senior project treatment" by porting it to the GPU. But, we know how many times I've said "GPU" before, don't we...speaking of which, I did receive some feedback on the Bullet forums as to where I was going wrong with enabling simulation on the GPU. However, the person who apparently discovered a solution has not contacted me yet. I will bug them again.
 (a decimated test .obj to represent the input head - no collider just yet)
 (the original .obj that Cat gave me...I would have to scale the program controls to accommodate its larger size...perhaps it would be a good idea to have this done automatically based on the mesh's bounding volume...)
Friday, February 5, 2010
New and Accomplished Goals
Goal: Generate key frame data that specifies the position and orientation of a "master control node" at each frame; save this data in a file
Goal: Parse the .kf file and store its data in a dictionary whose keys are frame numbers and values are position/orientation vectors
Well, I didn't end up using a dictionary data structure. Vectors with index values corresponding to keyframe numbers work just fine (negative keyframes are also possible in theory; my parser uses the start and end frames of the KF to calculate the offset needed to extrapolate vertex index numbers from keyframe numbers and vice versa).
Goal: Develop a simple GUI that allows the user to change the position/orientation of a rendered master control node according to the parsed .kf data (i.e. "play" a .kf animation)
I also accomplished this one. Check out the videos below to see the comparison between the test animation being played in Maya and test.kf being played using my GUI. To play back animations at the correct framerate (barring some other big process slowing my computer down, which might happen when the sim is brought over), I used a timer class that measures system ticks. I did not write this class (I found it here), but it uses common functions provided by both Windows and Linux OSes (I'm trying to keep things as platform independent as I can; as far as I know, FLTK/GLUT is platform independent; the only thing that isn't is my VS project file).
(first with Maya - I had to loop the animation manually, since letting Maya do the looping made the animation a little crazy)
(and here's my version - the messing around in the beginning is to show off the scene camera)
 (click to enlarge)
Goal: Plug Bullet into the GUI and use control laws to extrapolate the linear and angular velocity (or force) necessary to move the head rigid body so that its position/orientation matches that of the control node
I have not yet accomplished this one. But I will keep working towards it! Here's how I plan on breaking it down:
I have indeed accomplished this goal. I made a simple animation in Maya (only 16 frames long) and copied over the keyed position and orientation values by hand into a "keyframe" file (or KF). The KF file is a format that I devised using the OBJ format as inspiration. As far as I know, there are a couple other data formats that also have the .kf extension, but none of them seem to be extremely popular (I could always change the extension name to something else - it's just a renamed .txt file; that's all). Here is the test.kf that I created based on the Maya animation. To enter my project pipeline, a person would have to construct a converter to take their animation format and convert it into the KF format. This would not be very difficult, considering the simplicity of the KF. Hopefully the fact that it uses Euler angles won't be a problem.

(click to enlarge)
Goal: Parse the .kf file and store its data in a dictionary whose keys are frame numbers and values are position/orientation vectors
Well, I didn't end up using a dictionary data structure. Vectors with index values corresponding to keyframe numbers work just fine (negative keyframes are also possible in theory; my parser uses the start and end frames of the KF to calculate the offset needed to extrapolate vertex index numbers from keyframe numbers and vice versa).
Goal: Develop a simple GUI that allows the user to change the position/orientation of a rendered master control node according to the parsed .kf data (i.e. "play" a .kf animation)
I also accomplished this one. Check out the videos below to see the comparison between the test animation being played in Maya and test.kf being played using my GUI. To play back animations at the correct framerate (barring some other big process slowing my computer down, which might happen when the sim is brought over), I used a timer class that measures system ticks. I did not write this class (I found it here), but it uses common functions provided by both Windows and Linux OSes (I'm trying to keep things as platform independent as I can; as far as I know, FLTK/GLUT is platform independent; the only thing that isn't is my VS project file).
(first with Maya - I had to loop the animation manually, since letting Maya do the looping made the animation a little crazy)
(and here's my version - the messing around in the beginning is to show off the scene camera)
Since the new GUI is hard to see clearly in the video, here's a larger screenshot:
 (click to enlarge)
I have not yet accomplished this one. But I will keep working towards it! Here's how I plan on breaking it down:
- Insert all the necessary dependencies and linker definitions for Bullet into my VS project
- Create a class that asks Bullet for the vertices or faces of the head rigid body shape at each frame and uses this information to draw the shape (perhaps store the geometry data in an OpenMesh data structure) - I'll need to sift through the Bullet demo application code to find where/how scene objects are being drawn (maybe all I need to do is copy over a couple functions)
- Create a class that takes a pointer to the control node as input and generates force/torque values (using feedback controls), which it then applies to the Bullet head - if force and torque can't generate "instantaneous" control over the rigid body head, then I'll need to figure out how to generate velocity values instead
- Finish the remaining goal specified above
- Add the ability to render/draw the original input head and scalp OBJs (perhaps store the geometry data in an OpenMesh data structure)
- Add the ability to render the Bullet soft body key hairs as lines
- Read papers (and dissect tutorials) pertaining to writing shaders - I can't seem to make up my mind when it comes to which method of rendering I want to implement; hopefully more research will help me choose
Tuesday, February 2, 2010
Approach the Shaders with Caution
I have never written a shader before, so the rendering part of this project has me a little on edge. But then I found this tutorial (kind of outdated, but still decent) about how to generate fur shaders using DirectX Effect files (.fx). I was happy to get some of the tutorial code to compile and run. Now I have several resources showing me how to plug shaders into a framework. In fact, that's what confuses me most about shaders; I'm not sure how they're supposed to fit into my current code base. Since I am using OpenGL to render things in my scene at the moment, I'm guessing I should look into (O)GLSL. This tutorial looks like it might be helpful (now if I could just get the example code to compile on my computer...).
If I had a penny for every GUI I made...
Concept:

Currently, we have:
 Alas, it is just a skeleton GUI at the moment. All it can do is hide and show items like the scene light and scene grid. There's the "control node" there too, which can be fed position and orientation data, but I still need to create the player class (which will feed KF data to the control node).
Let's put some meat on this skeleton! (...)
Friday, January 29, 2010
Some Progress (Mach II)
Featured in this video, we have...
- 139 key hairs (generated from the geometry of a decimated input mesh)
- Demonstration of the ability to control a dynamic rigid body's angular/linear velocity with keyboard input
- Nullification of gravity
- Removal of the oscillation caused by the "springs" that keep the hairs anchored to the head
Goals for the weekend:
- Generate key frame data that specifies the position and orientation of a "master control node" at each frame (for example, a nod would be approximated by a change in node orientation every x number of frames); save this data in a file ("nod.kf")
- Parse the .kf file and store its data in a dictionary whose keys are frame numbers and values are position/orientation vectors
- Develop a simple GUI that allows the user to change the position/orientation of a rendered master control node according to the parsed .kf data (i.e. "play" a .kf animation)
- Plug Bullet into the GUI and use control laws to extrapolate the linear and angular velocity necessary to move the head rigid body so that its position/orientation matches that of the master control node (rendering the head rigid body isn't necessary, but it would be lovely to implement for debugging purposes)
Thursday, January 28, 2010
Rendering Options
Here are the two papers/videos that I've been reading over to get a sense of the different hair rendering techniques out there (click on the pictures to watch the presentation videos).

 Granted, I don't need to implement each method in full. For example, I could implement a single scattering (specular) + diffuse method, which is discussed in both papers (even though the first one uses it as a basis for comparison). As far as whether or not I'm going to render by strand or by strip, I'm not sure. I was originally planning on rendering each Bullet soft body hair as a LOD strip in OpenGL. One thing that I didn't consider before, however, is the interaction between key hairs in Bullet. Are collisions between the soft bodies being registered? It's difficult to tell. I don't think they are. It's important that I figure out how to turn on collisions between them, because intersecting strips are more obvious than intersecting strands (and even if I didn't have polygonal strips, lack of hair-hair collisions would cause the hairs to lie flat on the head...do not want!).
Zinke's "Dual Scattering Approximation for Fast Multiple Scattering in Hair"
Scheuermann's "Practical Real-Time Hair Rendering and Shading"
Granted, I don't need to implement each method in full. For example, I could implement a single scattering (specular) + diffuse method, which is discussed in both papers (even though the first one uses it as a basis for comparison). As far as whether or not I'm going to render by strand or by strip, I'm not sure. I was originally planning on rendering each Bullet soft body hair as a LOD strip in OpenGL. One thing that I didn't consider before, however, is the interaction between key hairs in Bullet. Are collisions between the soft bodies being registered? It's difficult to tell. I don't think they are. It's important that I figure out how to turn on collisions between them, because intersecting strips are more obvious than intersecting strands (and even if I didn't have polygonal strips, lack of hair-hair collisions would cause the hairs to lie flat on the head...do not want!).
Monday, January 4, 2010
Inspiration Is Out There
Even though I've been taking it easy over winter break, I'm still constantly looking for examples of cool hair simulation (even though it's not real-time). For example, Susan (from Monsters vs. Aliens) had some pretty cool hair. Kept me interested in the movie. ;-)


Subscribe to:
Posts (Atom)
